
One of the benefits of being an officer in the St. Petersburg Woodcrafters Guild is that I get to meet so many awesome local woodworkers who I would have never had the opportunity to meet otherwise.
Case in point – Andy Gibson. This guy is a young up and comer who builds ukeleles (and, now guitars, but that’s another post for another day), workbenches, and also has a penchant for sharpening old hand saws and returning them to fighting shape. I asked Andy if he could sharpen my old Disston No. 7 rip saw, and he said he would be happy to sharpen it for me. Not only is the saw sharp, I also have a two-part post that he wrote for your reading pleasure. Without any further ado, here’s part one – the sharpening. Take it away, Andy!
A lot of woodworkers love to use their hand saws but for some reason think that there is a black art to sharpening that hand saw. I don’t think there is and hopefully at the end of this article you won’t either. I think a lot of this fear of sharpening started because most of the hand saws we start with are neglected and poorly sharpened to begin with… so let’s get started.
In order to sharpen a hand saw you will need a few tools; a flat file, a triangle file of proper size, a sharpening stone, a saw set, a couple wood scraps, and some form of saw vise.
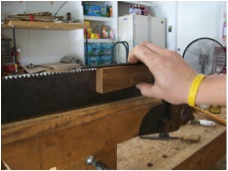
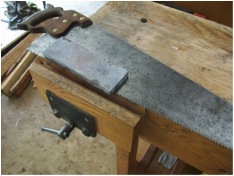
Let’s start with the vise. I made my own, but many antique versions can be had at flea markets and the like… all you really need are a couple flat boards you can use to clamp the saw blade and keep it steady for sharpening…
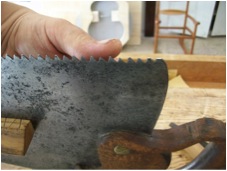
The first step in sharpening is to get all the teeth in line… when you are done you will want all the teeth tips to be the same height. That way all the teeth shave off wood. If half the teeth are short only the tall ones will cut and the saw will cut slowly and more roughly. Take the flat file and a square scrap of wood as a guide and file down the teeth running from heel to toe until you get a small flat on the top of each tooth… if the saw is badly “jointed” you may have to do this in step in multiple steps.
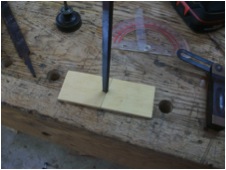
Once the teeth are jointed you can take your triangle file and start cutting your teeth… Wait! you need a guide. A rip saws teeth “rake” typically 8* meaning that they lean back at 8* off of 90* take you other scrap of wood and drill a hole in it slightly smaller than the tip of your file and draw your 8* line on it, then press your file into the hole making sure the file side is in line with you 8* line… now you have a guide for your file, just keep that piece of wood level as you sharpen and you file will cut the proper rake into the teeth.
I always start filing at the heel and work forward… you can mark the flat tips of the teeth with a Sharpie marker to more easily see your progress. Your goal here is to use you file to just remove that flat you made while jointing the saw. When filing the teeth you are cutting more material away from the back of the tooth, not the face (another way to say this is you are removing more material from the hill side of the tooth then the cliff side) Once you have filed to the proper angle and removed the flat you are sharp… if your saw was badly out of joint, you still have low teeth… so go back and re joint the saw. If you had to make more strokes on some teeth then others to get rid of the flat, it is a good idea to re joint and re file. The reason it’s better to do the jointing and shaping of the teeth in steps is so you don’t joint too much of the teeth away and get irregular teeth. On Toms saw I jointed the saw 3 times. If you have a tooth that has a big flat after jointing file on the back side of that tooth until you have almost removed the flat, then move to the next tooth. Take your time. If your file begins to squeak or skid across the metal as you file, your file is dull and it is time to rotate to a fresh side… files wear out. When the file is dull, it’s time to move on. Saw plates are hard steel so on a saw in poor shape you can easily use all 3 sides of the file and in some cases even need a second file to get all the reshaping and sharpening done.
You need to pick the right triangle file for your saw… you want a file that has sides that are roughly twice as tall as the teeth on the saw your sharpening. It the file is to big it will cut to round of a gullet (the space between teeth). If the file is too small you will dull unevenly. I know that Tools for Working Wood offers a guide to selection the right file for the tooth count of your saw.
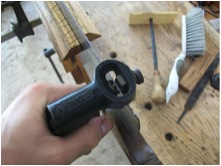
Once you have the saw filed to your satisfaction and all the teeth are in line and nicely pointy with no flats, it is time to set the teeth… my favorite saw set is a vintage Stanly 42x, however the 42x is no longer available new and you would have to find one either on eBay or at flea markets of from old tool suppliers. There are some decent new sets being sold by companies such as Lee Valley and Tools for working wood that work well. In fact for small toothed saws this is really the only set available. Look closely at your saw and set the teeth in the same direction that they were set before. You may want to mark a couple teeth at the heel of the saw so you know which way they are leaning, especially if you are going to be doing a good deal of filing. Don’t try to set the teeth in the wrong direction because there is a good chance the tooth will snap off. I would say to err on the side of less set, it is easier to add set then to take it away. Once you have all your teeth set, I take my triangle file and make one last light pass over each tooth.
It’s now time to stone the saw. Take the saw and lay the plate flat on your bench and run your sharpening stone lightly from heel to toe one or two times. This will remove any burrs from filing and remove a small amount of set. This step also polishes the tip of the tooth and makes the tip that much sharper.
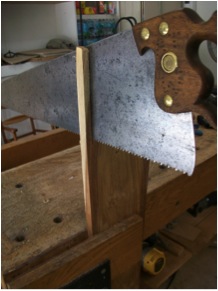
It’s now time for a test cut. I try to follow a straight line. If the saw drifts in one direction, it has too much se on that side. Take the stone and make one pass on the side that the saw drifts toward, then make another test cut. If the saw tracts straight’ you’re done. If the saw still drifts make another pass with the stone. If the saw binds in the cut you may need to add more set, readjust your saw set and reset, file, and stone your saw. That’s it! As with anything, it may take a little practice to get it right, but the more saws you sharpen the better and faster you will get.
A few final thoughts on sharpening. I personally always file from one side of the saw. Some people say to file every other tooth then flip the saw and file the teeth you skipped. This may have merit on a crosscut saw but is not necessary on a rip saw. I even file my cross cut saws from one side, that way I don’t have to make a different guide and my filing always comes out more Consistent. I don’t worry about making a burr on the teeth, I stone my saws after filing to remove any burr and it has never been an issue for me. Filing a cross cut saw is very similar to filing a rip accept you hold the fill at 15* off of 90* to the plate… on a rip saw you file straight across (90*). You typically also add a little rake on a cross cut, say 12* as opposed to 8* on a rip saw.

On Wednesday, Andy will share his secrets on how to make a brand new saw handle for an old saw.
Does this mean I’m Published?!?
If anyone would like to see more of my work you can check out my FB page at http://www.facebook.com/gibsonwoodworking
Maybe not, my page is Gibson Woodworking on Facebook.