Are you looking to add some flair to your next woodworking project? Sure you are! You are a woodworker, and after building lots of square things, you are ALWAYS looking to do something out of the ordinary to spice up the woodwork you are doing.
But, how can you do it?
Well, there is an easy way you can add graceful curves. And, if yesterday’s link of the week is any indication, there are LOTS of people who want to give bending wood a go.
By no stretch of the imagination should you look to me as an ‘expert’ in wood bending. In fact, I am building a table to hold a piece of custom pottery that a co-worker will be throwing, and this is the FIRST time that I have tried to bend wood.

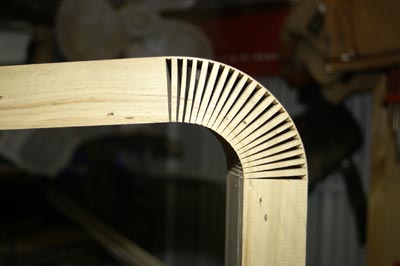
From all that I have read, there are three primary methods of bending wood. The first is kerf bending, which involves cutting saw kerfs into the back side of a piece of wood in order to make it bendable. It could work if I was building something where only one side was going to be visible, but that’s not what I am going for in this project. So, that method is out.

The next method under consideration is steam bending. I went to school at the University of Maryland, so I have lots of experience with steaming – blue crabs – YUM! The process is very similar – you have a container (a pot for crabs – a box for wood) and you have a source of heat to boil water. You place your lovelies into the container and put the spurs to the heat. After a set amount of time (20 minutes for crabs, a different calculation for wood), you can pull the lovelies out of the container and do what you have to with them (crabs = eat, wood= bend). Some species of wood do exceptionally well with steam bending (Ash is the first that springs to mind), and it is a time-honored way to do this, but it was too involved for me. Besides, the feels-like temperature in Florida right now is about 105 degrees F – definitely NOT steam bending weather.

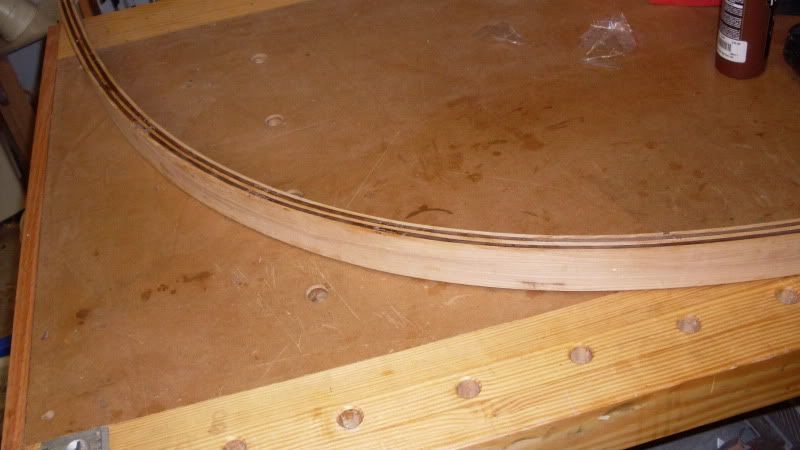
The method I settled on is making a bent lamination. I have seen this done before at a woodworking school I attended, and it looked like a neat trick. Basically, you take wood and rip it down to several flexible pieces. I was using ash, which has legendary bending ability, and walnut… which I wasn’t so sure of. I was going to alternate strips of ash and walnut to give the piece it’s own set of racing stripes.
For the pottery stand legs I am building, I aimed to have the wood rough sawn to 3/16″ thick. I then used an auxiliary planing bed at my planer to get the wood down to 1/8″ thick. I understand that you can make the slices thinner if you have a more radical bend, but all I needed was the arc of a circle to for the legs.
Now, I had 9 strips of ash and six strips of walnut, and I had to get them glued up into a coherent shape. My first thought was to use a form to bend them over. This is the way it should be done. I bought a sheet of particleboard and cut it into six 15″ wide by 48″ long blanks. Then, I tried my best to make a fair curve nice and smooth in the stuff.
Perhaps I was a bit hasty or careless, but that form I built was terrible. I couldn’t bend the wood to meet the form, and I wasn’t about to start cutting tissue-thin slats to showcase my bad cutting job.

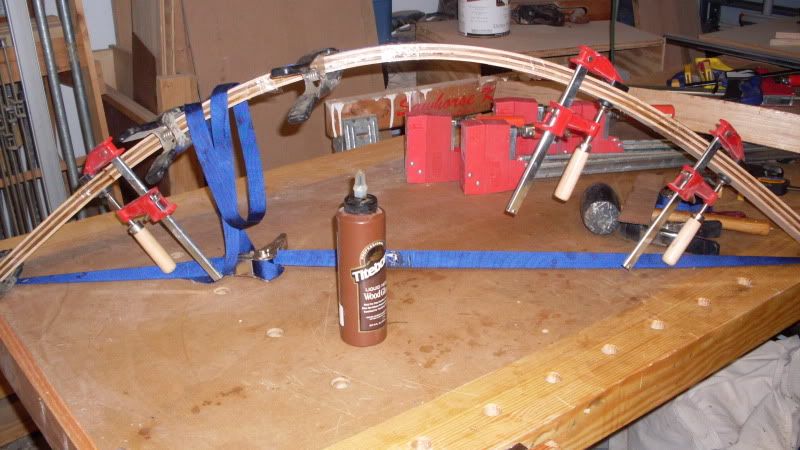
So, I struck on an interesting idea. Grabbing my band clamps which see very little action, I made my stack of boards and slipped them into a loop. From there, I pulled the strap tight while guiding the wood to flex in one direction.
The result kind of looked like a bow under tension. I had a perfect arc for the pieces with little effort. If you are planning on doing this, some ratcheting tie-down straps might be cheaper than buying outright band clamps.
I took the pressure off the stack, then I started to glue them up. I have heard several times that yellow glue will ‘creep’ over time when tension is applied. Since these legs will be under a considerable amount of tension, I decided to go with a traditional, less-toxic glue, bottled hide glue. Hide glue gives a more rigid bond, and is very creep resistant.
This stuff is just like hot hide glue except it stays fluid at room temperature. I spread a generous amount on both sides of each slat to be glued and made myself a sandwich of ash and walnut. Then, I looped the band clamp around the stack again and tightened up the group until I had the amount of bend that looked good to me. I took strips of packing tape and wrapped them around the stack at several places to serve as clamps, and – for good measure – I added more small clamps to the assembly to ensure everything held together well.

I gave the piece 48 hours in the clamp setup, then pulled them out. They came out looking decent, with only a few separations of the plies on the edges.
Hmm….
I guess maybe next time, I’ll have to work more carefully to build better forms and try a different method or try a different glue. But, with a little more glue and a few clamps, the big issues have been taken care of and the legs look as if they are ready to work with.
Will I ever bend wood again? You bet I will. Taking that first step of just doing it has gotten me off the straight and narrow path.

I thought this was a very interesting post thanks for writing it!
Interesting comment about the hide glue. Cool article!
So . . . how much Old Bay do you use when steaming boards?? 😉
I spice my oak and ash heavily, but I go easy on the others…
I like the kerf bending idea. You could probably cover the area with blue tape and fill the bent kerfs with tinted epoxy to look like an inlay of sorts. That would take away from the general ‘ugly’ of that type of bend.
Try cutting your curf on an angle and see what kind of twist you get…it’s trial and error at first but you’ll be surprised at the results.